cover page

cover page

Wednesday, January 18, 2012

A New Year with New Beginnings


I'm Back!

So I have had a fairly long absence from the blog world. I have been away and have just not had the chance to post anything. Not to mention we are in the middle of moving house to our Pear Tree Farm and I should so not be on here, but packing more boxes or cleaning madly....

We had such a lovely, mad, crazy, busy, beautiful Christmas this year. Little O absolutely loved her little red trike It was such fun seeing her open it and squeal when she saw it. She got straight on and immediately wanted to be riding around as fast as she could. Sooo cute.


I got a lovely old gold edged mirror for Christmas, which I have decided I will paint...just as Mr PTF expected I would when he bought it for me! (Ahh he knows me so well) I am thinking I might go for a black colour or maybe a blue grey colour. I had almost resolved on this and I happened to visit Miss Sew and So and saw her post and loved what she did with her mirror and now I am off to bunnings to get me some of that spray paint! I will show you a before and after post soon!

There has been alot happening in our neck of the woods, lots of mad packing...mild panic attacks as I look at my ever-growing list of things to do, not to mention lots of daydreaming and mental planning for our new house and the gardens. Pear Tree Farm here we come!


We get the keys to our beautiful house this Friday....this Friday!!!! I can hardly believe it! We are also still trying to sell our current house, fairly unsuccessfully. We have an open day this Saturday which is right on top of when we start our move...nice timing huh?! So we have decided to take it fairly slowly and we are actually going to paint some of the rooms inside before we move all the furniture in. Yay!!
When I get in there I shall be sure to take some before and after pics to show you all.


So that is all from me at the moment, I really must go and tick some things off my list. Sorry it is not more interesting with pretty pictures...I promise I will post some next time.

Hope you have all had a lovely Christmas and New Year. I am most certainly looking forward to this new year, new beginnings and exciting times and special memories ahead. Welcome 2012!


See you soon
xo Rachel


Wednesday, December 21, 2011

More Christmas Inspiration


Some more Christmas Gift Ideas

I thought I would show you a bit of green today. I know I do so love all things red at the moment, however I do have a weakness for green too. I just love this gorgeous green bowl.


It is such a lovely colour, so vibrant and I also love that it was made in France...and...the fact that I managed to pick it up at a thrift store for only $4 ...how nice is that?! I think it would look lovely with some white roses in it or some floating tealight candles or the green baubels as pictured or even just plain and simple as is.
I also love the white and green platter....very cracked, chipped and crazed, but that's how I like em!


And my last bit of green are these beads. Little Miss O loves to fling these round her neck and tottle off around the house, parading them around. So I thought I would share them with you....they make me smile.


Hope you are all surviving this last week before Christmas and are not crumbling under the pressure and crowded shopping centres?! I am done with the shops YAY! I now need to get myself into gear...stop blogging and start packing up house and home, not to mention clothes for our time away over Christmas and New Year....Hellllllp!!!


Before I go do that though, as promised in my last post here I am going to show you some more of my Christmas gift ideas. I have been thinking up a storm over here and have come up with a few goodies!

First up is:

Herbed Butter
I wanted to do something with the sage that I picked from my prolific supply in the vegie patch, so I have been trying to come up with some ideas for using it for gifts. I had the thought to make a herbed butter and put it in a cute jar and label it and give it away to someone for Christmas this year. Cute idea and pretty flippin easy!

Here is my recipe

Herbed Butter 


Ingredients:
1 Tub of Spreadable butter
Handful of fresh herbs of your choice I am using sage for this one
Salt and pepper
Smidge of lemon juice


Method:
Allow butter to become soft....room temperature will do.
Chop up herbs finely


Mix herbs into butter in a bowl
Add salt and pepper and lemon juice


Spoon butter into sterilised jar, seal and refrigerate.
Attach a cute label with some ideas for how to use it (ie, on a steak, on a french stick with pasta on toast...etc)


There you have it...too easy in my book!

My other brainwave with trying to use up herbs is to make herb infused olive oil. Now I have never done this up until writing this post, so I am no expert by any stretch. I looked some info up online about flavouring oils and you do need to be careful to do it properly. You need to make sure you use sterilised jars and also be careful in preparing the herbs.
Here is the recipe


Lemon and Sage Olive Oil


Ingredients:
Zest of 1 lemon (must be completely dried out.)
Good quality olive oil (however much you need for your jar/bottle size)
Dried handful of sage (or another herb of your choice, but it must completely dried unless you plan to use it within the week and keep it refrigerated)
1 Sterilised jar or bottle (whatever size you want)


Method:
Peel the lemon with a peeler and place on a tray to dry completely. I read online that this may take a few days. You could alternatively dry it in a dehydrator (but as if I have one of those) or you could put the tray in the oven on very very low. The main thing is that both the herbs and the zest need to be completely dry, or else bacteria can start to grow in the oil.

Give the lemon zest a bit of a bruise with a mortar and pestle (just to bring out the oils)


Add the dried herbs and lemon zest to the jar or bottle.


Pour in enough olive oil to fill your bottle.


Label and seal. Done.

Store in a cool, dark place. Keep an eye on it and if the herbs look a bit funny or you start to notice any bubbles you probably need to discard it. It means that you may not have dried out the herbs or lemon zest properly and bacteria has started to form. If you are worried about it, you can always just keep it in the refrigerator and use within a week. Go here for more information about safely infusing oils.


Too easy yes?!

Next up is nice and simple too! My sister started making this a couple of years ago and it has been a great hit ever since. Can't remember where she got the recipe? It may have been in a Coles recipe booklet, but I just think of her when we have this so I am going to call it her Peppermint Chocolate Slab. It is super easy and really tastes yum...surprisingly.

Peppermint  Chocolate Slab


Ingredients:
400 grams of chocolate (I actually used coles chocolate blocks and had a mixture of dark chocolate and milk chocolate, which was quite nice.


Not too bitter or not too sweet). You can even use chocolate melts if that is all you have.


12 Peppermint flavoured candy canes


Method:
Prepare a baking tray with some baking paper/grease proof paper
Melt the chocolate in a bowl....I use the microwave to do this, but you can do it over a double boiler or whatever over the stove if you prefer.


Crush up (pound the living daylights out of) the candy canes


Spread the melted chocolate out on the lined tray as smoothly as you can, then add the crushed up candy canes on top.


Refrigerate till set. Should take about 1 hour or so.
Break up the hardened chocolate slab or cut up into shard-like bits.


Place in a nice jar or wrap in celophane and label with a cute gift tag and you're done! How cute is that?


Mr PTF has just seen this post and these peppermint slabs have gotten the better of him.....he is raiding the fridge as I write this and eating some with a cup of tea....better go and stop him....

See you soon,
Hope these ideas have given you some inspiration!
xo Rachel


I linked up with...


Monday, December 19, 2011

Christmas gift ideas


Some ideas for you this Christmas...

Now, as you are probably aware by now, I am into simple, easy and if possible, budget-friendly gifts. But how the heck do you do that?!
Well, I have been having a little brainstorming session with myself....Little O wasn't much help in this department, so I was on my own here. Nevertheless, I managed to come up with a few ideas that I am going to try this year. So I am thinking I will share them with you here. What do you think?!

Idea number 1.
I found this recipe on Design Sponge a gorgeous blog I often visit, with so many great ideas, recipes and before and afters to ooh and ahhh over. Its fairly easy, although I had to try a few times to try and make the caramel...so be prepared to have a bit of a practice...

Salted Caramel


in the kitchen with: kathreinerle’s salted caramel spread
Image from Design Sponge


Ingredients:
1 1/2 cups (300grams) sugar
3 1/2 tbsp water (I actually ended up not adding the water as it tended to make it crystalise, so I would suggest trying it without the water and see how you go)
240 grams of butter cut into small pieces
1 tsp salt
200grams of warmed cream

Method:
Place the sugar evenly in a saucepan on low to moderate heat, it should start to liquefy at different spots, usually around the edges first. You need to watch it carefully so that it doesn't burn. Once it starts to brown and liquefy around the edges of the pan, start to draw the sugar in to the middle of the pan to prevent from burning. Once burnt you cannot rescue...you will have to start again.It is also important not to over-stir it as it can cause the sugar to crystalise. It should start to turn a nice light mellow colour and then darken, so you need to watch it carefully that it doesn't get too dark.
If the caramel starts to go a bit lumpy/crystalise, just lower the heat and stir it a bit more. Go here to get a more detailed how-to.
Next....
Once you get to the colour you want (the light the colour the sweeter it is...the darker it gets the more bitter caramel flavour you get...I like it a little dark.), add the butter, little by little, stirring with a wooden spoon as you go. Be careful, though, as it can splatter.
Add the salt and cook for another 2 minutes
Remove the pan from the heat and add the warmed cream. Keep mixing until well combined.
Pour into sterilised jars and allow to cool before sealing and refrigerating. The caramel spread needs to be stored in the fridge and can be kept in the fridge for up to 3 months....but as if it would last that long?! Well itwouldn't in my house, that's for sure! It is soooooo delicious!

                             
Image from Design Sponge
  
Idea number 2.
This next idea is so easy...I promise!! I have always wanted to make some vanilla sugar and to own the truth I never use real vanilla pods. I am a vanilla extract kinda girl...mainly because its cheap as. So this recipe really appealed to me because it just seems such a treat (sad I know!) and you can use it for so many things.

Vanilla Sugar


Ingredients:
1 vanilla bean pod
1 cup caster sugar
1 mason jar or jam jar (sterilised)


Method:
Slice vanilla bean pod down its length, then chop it up into quarters


Place in mixing bowl with the caster sugar and mix


Pour into jar and seal.


Can't get much quicker or easier than that eh?! You can make a little tag to tie onto the jar and include some ideas for how to use the sugar eg. sprinkle on pancakes or french toast, dust over freshly baked cakes or shortbread.

Idea number 3.
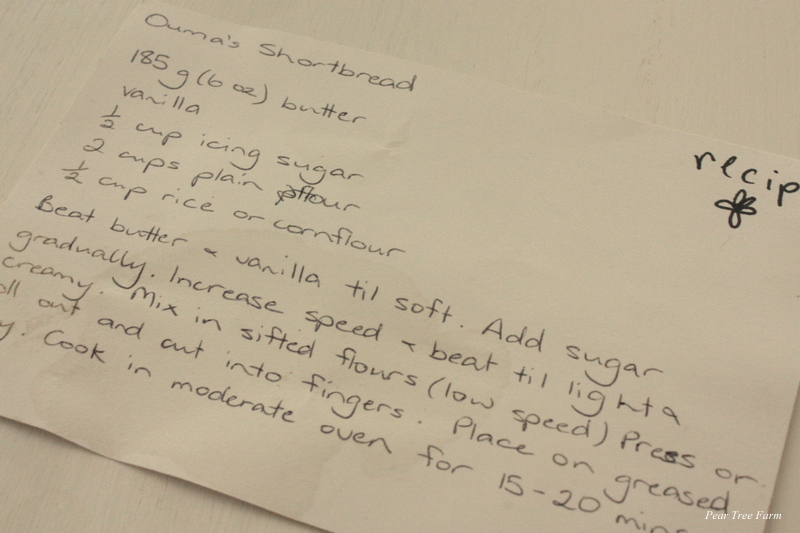
This...as the name so cleverly suggests, is my Ouma's shortbread recipe. I have great memories of going to her house and eating shortbread she had lovingly made for all us kids and sipping (very watery) cordial from her aluminium coloured cups. I absolutely loved going to her house and it was always such a treat to eat her shortbread. My mum handed down this recipe to me for my kitchen tea party before I got married. I had fun making it for this post and taking pics of all the processes, I think it just made me appreciate it a whole lot more. Hope it works for you!

Ouma's Shortbread


Ingredients:
185g (6oz) of butter
1/2 cup of icing sugar
2 cups of plain flour
1/2 cup rice or cornflour (I usually use rice flour)
A good dash (or lashing!) of vanilla (and if you wanted it to be extra special you could use a vanilla bean)
Another twist, could be to add orange or lemon zest for a slightly citrus flavour. Or.....you could add some chopped up dried cranberries, to add a pop of Christmas red and we all know how I love red!!
You can also sprinkle a little sugar on the dough before it goes in to the oven to bake....adds a nice crunch.

Method:
Beat butter and vanilla until soft.


Add sugar gradually. Increase the speed of the beaters and mix until light and creamy. Mix in sifted flours (on low speed).


Press or roll out and cut into fingers or use cookie cutters.


Place on a greased tray or on grease-proof paper.


Cook in moderate oven (180 degrees) for 15-20 mins. Until a nice pale golden colour.
Cool and package in clear plastic/celophane bags or in a cute mason jar, add a cute little Christmas gift tag and there you have it!


So those are my gift ideas for today.
I may post a few more that I am concocting as we speak....we'll see how I go for time and how many things I can tick off on my ever increasing to-do list!!

See you soon,
xo Rachel


P.s Don't you think all this mixing would work sooooo much better and make everything taste soooo much more delicious if you could just use one of these babies? I am pretty sure it would. The gorgeous Sarah from abeachcottage.com is giving one away for christmas....not bad huh?! Sarah has the most gorgeous blog and I often love popping by for a quick visit and a peek at her lovely posts. You can oogle at this beautiful red mixing baby here

Related Posts Plugin for WordPress, Blogger...