cover page

cover page
Showing posts with label Good Food. Show all posts

Monday, December 24, 2012

Christmas party at Pear Tree Farm!


So, we had our first Christmas gathering at Pear Tree Farm and it was gorgeous!!
I absolutely loved being able to share special moments with my wonderful in-laws. Cooking together in the kitchen, watching my little PTF kiddies playing with their cousins. Yummy scrummy Christmas food, Michael Buble and Ella Fitzgerald crooning Christmas carols in the background, perfect sunny weather, swims in the pool....what more could a girl want eh?!

Lately I have been a bit of a crazy person I have to admit....poor Mr PTF is still recovering from our 2aminthemorningmarathonofpreparationsforourreallykeepingitsimpleChristmasgathering.......
Oh dear. What shall I give Mr PTF as a peace offering??!

I did enjoy organising and making some of these things for our party. We made bon bons with brown paper, green confetti (hole punched by me one night...never again) a lindt ball and a blessing for each person.


We also strung paper doilies and green glass bauballs from the outdoor market umbrella...looked so gorgeous.


It was so so special to be able to host Christmas at our place (something we have never done in all the 5 years of our marriage!) 
One thing I will say though is that it is NOT a good idea to attempt recipes one has never attempted before on the day you are hosting a Christmas party....not a good idea.

All miraculously turned out fine, but it did make things a little bit hectic! We had a beautiful chocolate pav/meringuey torte thing....half following a recipe half not. I found the recipe online...its a Nigella recipe and it has chocolate in it...how wrong could it go right?!


Chocolate Raspberry Pavlova

For the chocolate meringue base

  • 6 medium egg white(s)
  • 300 gram(s) caster sugar
  • 3 tablespoon(s) cocoa powder (sieved)
  • 1 teaspoon(s) balsamic vinegar (or red wine vinegar)
  • 50 gram(s) dark chocolate (finely chopped)

For the topping (I din't follow this at all....I made up my own version...see below this recipe)

  • 500 ml double cream
  • 500 gram(s) raspberries
  • 3 tablespoon(s) dark chocolate (grated)
Method:
  1. Pre-heat the oven to 180°C/gas mark 4 and line a baking tray with baking parchment.
  2. Beat the egg whites until satiny peaks form, and then beat in the sugar a spoonful at a time until the meringue is stiff and shiny. Sprinkle over the cocoa and vinegar, and the chopped chocolate. Then gently fold everything until the cocoa is thoroughly mixed in. Mound on to a baking sheet in a fat circle approximately 23cm in diameter, smoothing the sides and top. Place in the oven, then immediately turn the temperature down to 150°C/gas mark 2 and cook for about one to one and a quarter hours. When it's ready it should look crisp around the edges and on the sides and be dry on top, but when you prod the centre you should feel the promise of squidginess beneath your fingers. Turn off the oven and open the door slightly, and let the chocolate meringue disc cool completely.
  3. When you're ready to serve, invert on to a big, flat-bottomed plate. Whisk the cream till thick but still soft and pile it on top of the meringue, then scatter over the raspberries. Coarsely grate the chocolate so that you get curls rather than rubble, as you don't want the raspberries' luscious colour and form to be obscured, and sprinkle haphazardly over the top, letting some fall, as it will, on the plate's rim.


For my filling (as I actually split the mixture to make two meringue discs)

1/2 block of philadelphia cream cheese
1 smallish tub marscapone
1/4 to 1/2 cup icing sugar sifted
1 vanilla bean (or vanilla extract is fine too!)
splurge of thickened cream

beat in a bowl till well combined (taste and make sure its not too sweet as you want it to cut through the sweetness of the meringue)

I then spread a layer of the filling in between the two layers of meringue, followed by raspberries and grated dark chocolate. Then I repeated this step on the top of the meringue and put some finely chopped mint on top.

So there you go!

We also had some beautifully bbqd prawns (cooked by my gorgeous hubby) and some salmon also cooked to perfection on the bbq.


Lunch was a very yummy affair that is for sure.
We also had a couple of salads. One with pommegranite....which just looks so beautiful and Christmassy don't you think?!

\

The other one was a fennel, orange, wombok and mint salad. Both so beautiful and fresh. A great way to kick off our Christmas feasting me thinks!


Despite being a little crazy with wanting to try new recipes and hand make gifts for Christmas....I did enjoy preparing for this event and planning and scheming it.

Meanwhile....there has been alot of baking and "gingerman" (as miss O calls them) making, beautiful smells of christmas trees and spices in the air.


Present making has been well underway and most things completed just in the nic of time fortunately!


This is a library book bag I made for my nephew....fortunately you can't look close enough to see all my mistakes...yet again, I attempt something I have never made before....why?! I never learn!

I do love the fact that I can make someone a present though, rather than going out and just buying more STUFF.... I just wish I was a little more organised and could have started this project in October or November....not two weeks before the party....mmm.

I hope you all enjoy your Christmas feasting, festivities, fun and whatever you do this time of year with family and friends.


I am off to spend some time with all my family now and I can relax a bit and not attempt any more foreign recipes....maybe...


See you soon,
xo Rachel


Monday, December 19, 2011

Christmas gift ideas


Some ideas for you this Christmas...

Now, as you are probably aware by now, I am into simple, easy and if possible, budget-friendly gifts. But how the heck do you do that?!
Well, I have been having a little brainstorming session with myself....Little O wasn't much help in this department, so I was on my own here. Nevertheless, I managed to come up with a few ideas that I am going to try this year. So I am thinking I will share them with you here. What do you think?!

Idea number 1.
I found this recipe on Design Sponge a gorgeous blog I often visit, with so many great ideas, recipes and before and afters to ooh and ahhh over. Its fairly easy, although I had to try a few times to try and make the caramel...so be prepared to have a bit of a practice...

Salted Caramel


in the kitchen with: kathreinerle’s salted caramel spread
Image from Design Sponge


Ingredients:
1 1/2 cups (300grams) sugar
3 1/2 tbsp water (I actually ended up not adding the water as it tended to make it crystalise, so I would suggest trying it without the water and see how you go)
240 grams of butter cut into small pieces
1 tsp salt
200grams of warmed cream

Method:
Place the sugar evenly in a saucepan on low to moderate heat, it should start to liquefy at different spots, usually around the edges first. You need to watch it carefully so that it doesn't burn. Once it starts to brown and liquefy around the edges of the pan, start to draw the sugar in to the middle of the pan to prevent from burning. Once burnt you cannot rescue...you will have to start again.It is also important not to over-stir it as it can cause the sugar to crystalise. It should start to turn a nice light mellow colour and then darken, so you need to watch it carefully that it doesn't get too dark.
If the caramel starts to go a bit lumpy/crystalise, just lower the heat and stir it a bit more. Go here to get a more detailed how-to.
Next....
Once you get to the colour you want (the light the colour the sweeter it is...the darker it gets the more bitter caramel flavour you get...I like it a little dark.), add the butter, little by little, stirring with a wooden spoon as you go. Be careful, though, as it can splatter.
Add the salt and cook for another 2 minutes
Remove the pan from the heat and add the warmed cream. Keep mixing until well combined.
Pour into sterilised jars and allow to cool before sealing and refrigerating. The caramel spread needs to be stored in the fridge and can be kept in the fridge for up to 3 months....but as if it would last that long?! Well itwouldn't in my house, that's for sure! It is soooooo delicious!

                             
Image from Design Sponge
  
Idea number 2.
This next idea is so easy...I promise!! I have always wanted to make some vanilla sugar and to own the truth I never use real vanilla pods. I am a vanilla extract kinda girl...mainly because its cheap as. So this recipe really appealed to me because it just seems such a treat (sad I know!) and you can use it for so many things.

Vanilla Sugar


Ingredients:
1 vanilla bean pod
1 cup caster sugar
1 mason jar or jam jar (sterilised)


Method:
Slice vanilla bean pod down its length, then chop it up into quarters


Place in mixing bowl with the caster sugar and mix


Pour into jar and seal.


Can't get much quicker or easier than that eh?! You can make a little tag to tie onto the jar and include some ideas for how to use the sugar eg. sprinkle on pancakes or french toast, dust over freshly baked cakes or shortbread.

Idea number 3.
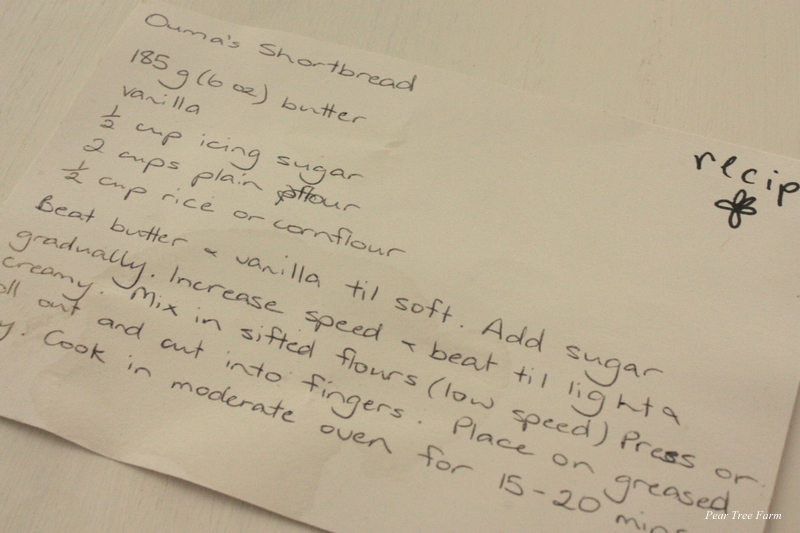
This...as the name so cleverly suggests, is my Ouma's shortbread recipe. I have great memories of going to her house and eating shortbread she had lovingly made for all us kids and sipping (very watery) cordial from her aluminium coloured cups. I absolutely loved going to her house and it was always such a treat to eat her shortbread. My mum handed down this recipe to me for my kitchen tea party before I got married. I had fun making it for this post and taking pics of all the processes, I think it just made me appreciate it a whole lot more. Hope it works for you!

Ouma's Shortbread


Ingredients:
185g (6oz) of butter
1/2 cup of icing sugar
2 cups of plain flour
1/2 cup rice or cornflour (I usually use rice flour)
A good dash (or lashing!) of vanilla (and if you wanted it to be extra special you could use a vanilla bean)
Another twist, could be to add orange or lemon zest for a slightly citrus flavour. Or.....you could add some chopped up dried cranberries, to add a pop of Christmas red and we all know how I love red!!
You can also sprinkle a little sugar on the dough before it goes in to the oven to bake....adds a nice crunch.

Method:
Beat butter and vanilla until soft.


Add sugar gradually. Increase the speed of the beaters and mix until light and creamy. Mix in sifted flours (on low speed).


Press or roll out and cut into fingers or use cookie cutters.


Place on a greased tray or on grease-proof paper.


Cook in moderate oven (180 degrees) for 15-20 mins. Until a nice pale golden colour.
Cool and package in clear plastic/celophane bags or in a cute mason jar, add a cute little Christmas gift tag and there you have it!


So those are my gift ideas for today.
I may post a few more that I am concocting as we speak....we'll see how I go for time and how many things I can tick off on my ever increasing to-do list!!

See you soon,
xo Rachel
                                                    

P.s Don't you think all this mixing would work sooooo much better and make everything taste soooo much more delicious if you could just use one of these babies? I am pretty sure it would. The gorgeous Sarah from abeachcottage.com is giving one away for christmas....not bad huh?! Sarah has the most gorgeous blog and I often love popping by for a quick visit and a peek at her lovely posts. You can oogle at this beautiful red mixing baby here

Tuesday, December 13, 2011

On getting Festive


Here's what's festive at our place...

So I thought I would show you some of my 'getting festive' activities around here.

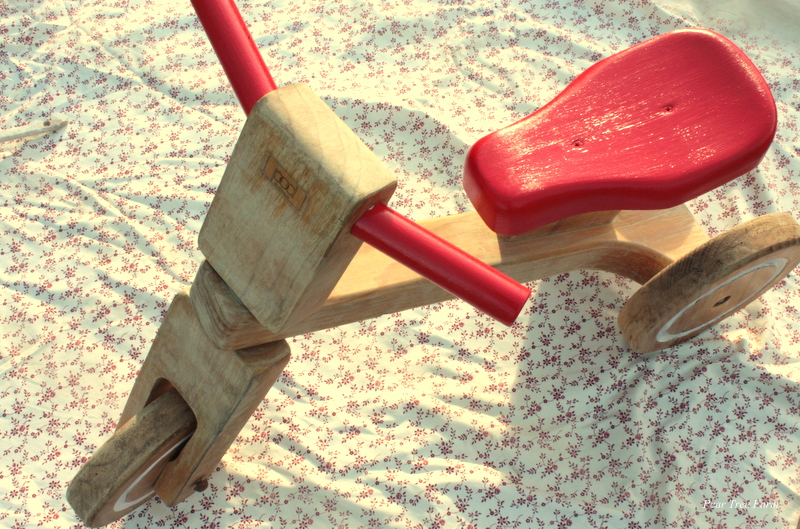
First up I am painting this little wooden trike for Little O's Christmas present. We are keeping things simple this year, as I have said before and you can't really get more simple than this little trike that we picked up on the side of the road...on yet another one of my hard-rubbish-collection binges ! 


So, I decided to paint the little seat red, how festive of me eh?! All it needs is a little cleaning and a rub back and then slop some red paint on and voila! A Christmas present ready to go!

Here's how I did it.
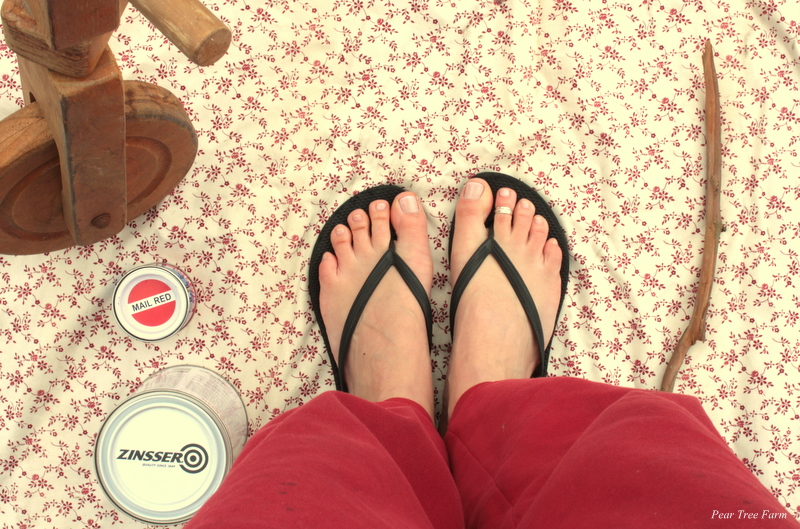
Firstly I gave it all a sand and clean....in my very festive and somewhat grotty red trackies!


Next I primed the seat and the wheels and handles with Zinsser primer. The primer was pretty pricey but is supposed to be a pretty good primer so I decided to shell out the $39. I figured that as I am planning to get my white-painting mojo into gear, and get painting,  I am gunna need a bit of it anyway.


I actually contemplated not painting it red on seeing it with the white primer...it looked quite cute just white.


Anyway...moving on. Next I gave it a couple of coats of fire engine red which cost about $9.


I decided to leave the wheel rims white, so I just have to give it a top coat of a white gloss paint.

I gave the rest of the body a bit of a sand and rub down. When I get around to it I will give it a coat of clear varnish.

And that is it.


Pretty easy.


I can just see Little O scooting around on this...can't wait!


Next, I am doing some Christmas baking. I shall put on a Christmas movie....mmm maybe: The Family Stone, or The Holiday, or maybe Its a Wonderful Life, and then I shall get baking!!

I thought I would share my mum's Easy Peesy Coconut Macaroons with you today. It is sooo easy and quick. Only two ingredients and they look so sweet done up in a little clear cellophane or in a cute recycled jam jar.

So here it is...
Mum's Coconut Macaroons


Ingredients:
2 Cups coconut
1/2 a 400g can of condensed milk


Now to be honest, I don't actually measure the ingredients!! Gasp! I literally just add a bit of each and until it is the right consistency. 


Method:
Dump ingredients in a bowl and mix together with spoon
It should be able to come together in a ball...if too wet add some coconut. If too dry, add more condensed milk....it is seriously that easy.


Roll or form into fairly small balls and place on a greased tray.


Bake in a moderate oven 180 degrees Celsius. For about 10 mins (possibly less) until just golden.


Cool, then eat...I mean...wrap up in some celophane, or place in a jar and you're done!


How easy is that??!! I just lurrrrve this recipe. It is so quick and you can whip it up if you have unexpected guests.

So there you go! Have a go and let me know how it turns out!

I am loving the idea that Christmas can be done by hand-making gifts, not rushing out spending a fortune on stuff.

I am thinking I will try and post some of my ideas for handmade, easy peesy Christmas gifts!!

Lastly....to get me feeling festive....I thought I would do this....


What do you think? A bit of a Christmas pop of colour on my hands!!

See you soon
xo Rachel
Related Posts Plugin for WordPress, Blogger...